>>
Industry>>
Media and entertainment>>
How to Edit ProRes Video on a ...How to Edit ProRes Video on a Mac: Storage, Playback, and Export Checks
The Silicon Review
28 August, 2026
Author:
Guest
ProRes was designed for editing, while compressed video formats usually focus on smaller files. It stores complete frames, which helps footage play and move smoothly during timeline editing. However, ProRes files are large and can quickly use significant space on your drive.
Storage can become a bigger concern than processing power when working with ProRes footage. This guide uses Filmora video editor to test storage, playback, editing, and export performance. Even video editing software on a Mac needs enough storage for a smooth ProRes workflow.
Part 1. Confirm the ProRes File Details
Knowing the ProRes variant helps you estimate storage needs before starting your complete project. The table below compares common variants for movie editing software for Mac workflows:
|
ProRes Variant |
Rate at 1080p and 30 fps |
Roughly Per Minute |
What It Is For |
|
ProRes 422 Proxy |
About 45 Mbps |
Around 0.34 GB |
Offline editing and proxy workflows |
|
ProRes 422 LT |
About 102 Mbps |
Around 0.77 GB |
Smaller files with good editing quality |
|
ProRes 422 |
About 147 Mbps |
Around 1.10 GB |
General-purpose editing and acquisition |
|
ProRes 422 HQ |
About 220 Mbps |
Around 1.65 GB |
Higher-quality acquisition and finishing |
|
ProRes 4444 |
About 330 Mbps |
Around 2.48 GB |
High-quality 4:4:4:4 video and alpha-channel workflows |
ProRes Proxy saves storage, while LT keeps good quality with smaller file sizes. Standard 422 suits common camera footage, while HQ and 4444 need more storage. Multiply storage by footage length, remembering that 4K files require much more space.
Part 2. Prepare Storage for the Project
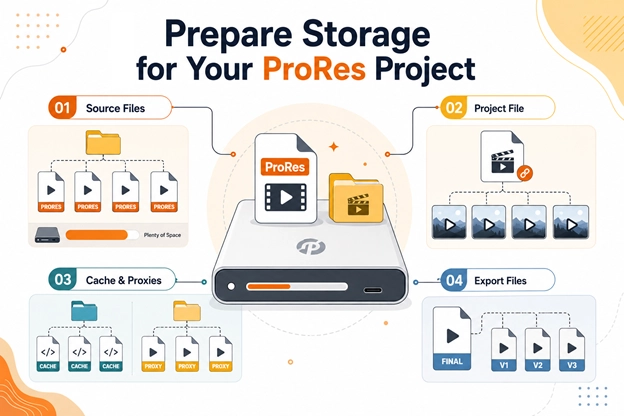
Storage planning helps video editing programs for Mac handle large ProRes projects without problems. The storage areas shared below need enough space throughout your editing project:
- Source Files: Keep original ProRes footage on a drive with enough free storage space.
- Project File: Stores project information and links to every imported media file location.
- Cache and Proxies: Hold temporary render files and proxy media created during editing.
- Export Files: Include the final video and any previous versions saved during editing.
Drive speed matters because 4K ProRes footage can place heavy demands on storage devices. Using two ProRes streams increases the workload, making slow external drives less suitable. An internal SSD or fast external SSD provides better support for demanding editing projects.
In Filmora Mac, access Media Cache through File and Preferences to manage render files. Enable automatic cache clearing after projects close to prevent storage from filling over time. For better file organization, follow the Filmora Archive Project guide when moving projects between drives.
Part 3. Import a Representative ProRes Clip into Filmora
Never hand a full shoot to an untested editor. One clip taken from start to finish tells you more than any specification page.
Step 1. Import and Play the Clip
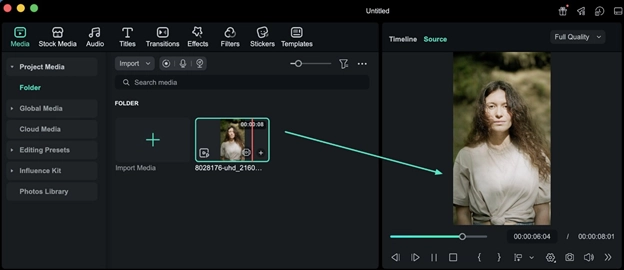
First, choose the ProRes clip you shot on your iPhone or iPad and play it on your Mac’s player. Then, open Filmora and create a new project. Press “Import” to import the clip and play it in the preview panel to see if the picture holds steady.
Step 2. Place It on the Timeline
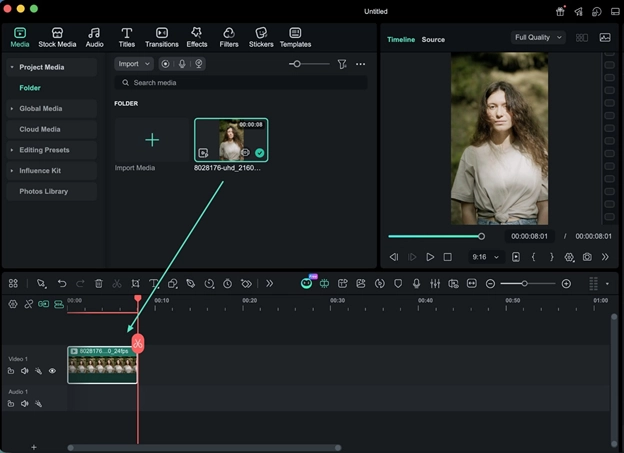
Then, drag and drop the clip onto your timeline. Timeline playback uses more resources, so performance problems may appear here first.
Step 3. Add One Typical Edit
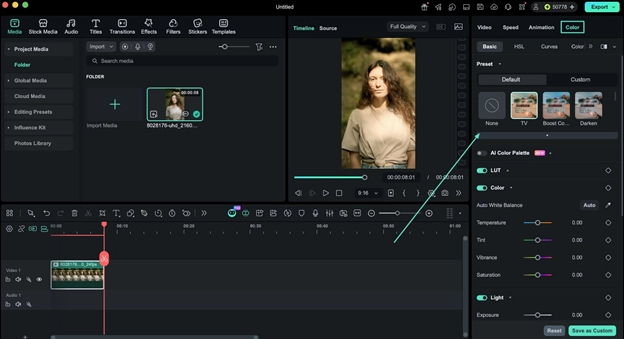
Select the ProRes clip from your timeline, open “Color” in the right-side properties panel, make one basic adjustment, and check playback.
Step 4. Export a Short Sample
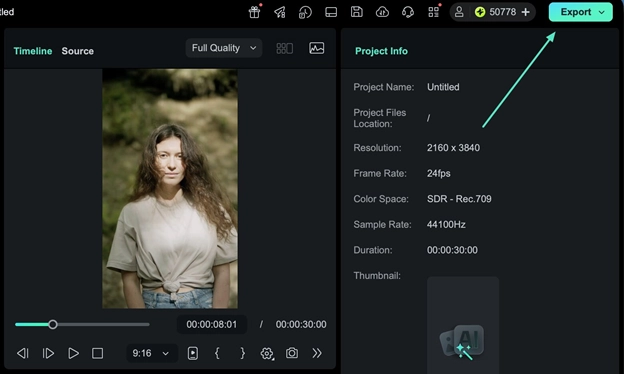
Cut the timeline down to roughly 30 seconds and press the “Export” button in the top right corner. Note the export time, as it helps estimate how long the full video takes.
Part 4. Use Proxies or Lower Preview Quality When Needed
If your ProRes test stutters, video editing software on a Mac offers performance options. Try lowering preview quality before creating proxies, since this may improve playback performance.
Lower the Playback Quality First
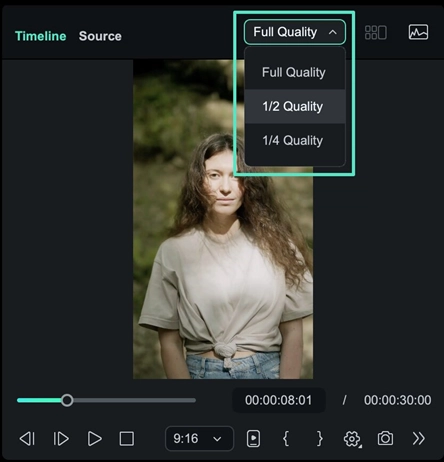
Use the display control above Filmora's preview window to reduce playback resolution when needed. Filmora may also suggest reducing preview quality when it detects playback lag issues. This setting needs no extra storage and does not affect your final export quality.
Turn On Proxies Only If That Fails
Open “Wondershare Filmora” > “Preferences” > “Performance” to access the proxy settings available within Filmora. Set a resolution threshold so Filmora creates proxies for larger video files when needed. You edit smaller proxy copies, while Filmora uses original footage during the final export.
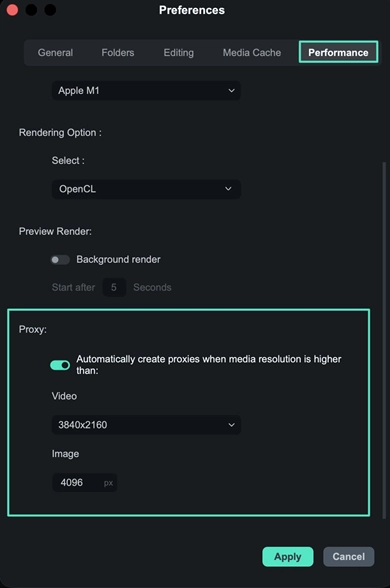
Proxies require extra storage, which matters when large ProRes files already consume space. Most video editing programs for Mac provide preview and proxy options for smoother editing. The Filmora Project Guide also explains project setup and media organization before editing begins.
Part 5. Check Color and HDR Settings
Footage recorded in Log or HDR may require extra attention before editing begins. The table below shows important settings to confirm before working with ProRes footage:
|
What to Confirm |
Why It Matters With ProRes |
|
Log or Graded |
Log footage appears flat by design and needs grading rather than correction. |
|
Project Color Space |
Check the project color space to match your footage and intended output. |
|
Display Support |
HDR previews require an HDR-capable display to show the correct image range. |
|
GPU Acceleration |
GPU acceleration can support HDR processing and related export options in Filmora. |
|
Export Target |
Choose a color space supported by the platform or device receiving your video. |
ProRes Log footage can look washed out because it preserves more image information. Use proper color grading instead of brightness adjustments to preserve its tonal range.
Part 6. Export and Inspect a Short Sample
Review your short sample before exporting the complete timeline from movie editing software for Mac. To identify possible export problems, review the checks shared below before continuing further:
|
Normal for ProRes |
A Real Problem |
|
The export dwarfs what an MP4 would weigh |
The export is far smaller than the source clip |
|
Export time runs past the clip duration |
Exporting takes many times the length of the video |
|
Detail softens while preview quality is reduced |
Detail softens in the exported file |
|
A Log clip still looks flat before grading |
A graded clip looks flat after export |
|
Audio stays locked across the whole sample |
Audio drifts further as the clip runs on |
Play the sample on the device or screen intended for final viewing. Check playback and audio issues before spending time exporting the complete project.
Conclusion
ProRes performance depends on file type, storage speed, resolution, and project demands. Test one representative clip in Filmora before starting your complete editing project. Good video editing software on a Mac still depends on suitable storage performance. A short test helps confirm playback, editing, and export before committing further.




















Comments